
Always wondered if tiling window management on macOS is an option? Me too! On linux I was a fan of the i3wm tiling window manager. I liked the simplicity and the overall value you get out of your pixels while using a tiling window manager. I3wm also ensured I got the most out of my keyboard to navigate my machine, as opposed to the frequent use of the mouse. In this post, I’ll take you through what I installed for a similar experience on macOS! Let’s go! 🙌
Why use a tiling window manager?
The default window manager on an operating system are know as ‘stacked window manager’. It basically means that as soon as you start your first application after starting your machine, it will cover the whole screen. Whenever you open a second application, it is shown directly in front of the application you had already open.
Tiling window management mostly means that windows do not overlap. When you open that second application on your machine, the screen will be cut in half, so that the two open applications will each cover 50% of your screen. Knowledge workers like me have a big screen available at work, so having two (or even more) applications open side by side can really be beneficial.
Prerequisites
Ok, let’s start with a remark before you dive in. This setup is not for everyone. Some people might see this as a setup for software developers. For this to work, you’ll need to:
- be familiar with Homebrew on macOs
- be comfortable with editing textual config files
- be comfortable using a terminal (don’t know what that is? Then stop reading, or first read this)
- be ok with tinkering a bit to get things to work to your likings
If you’re ok with all this, read on!
Software to use
So, now that’s all out of the way and you decided to tag along, I’ll go through the installation and configuration of three pieces of software:
- yabai : the most important app, this one will be on control of your windows.
- skhd: used to implement keybindings you like.
- spacelauncher: used to launch applications like a champ.
Let’s go! 😬
yabai
Yabai is the piece of software that will take control of the windows on your machine, all in a tiling fashion of course.Yabai i
Disclaimer: yabai is licensed throught the MIT license and is to be used on your own discretion / risk (see yabai’s own disclaimer). Although I haven’t had any issues with it (it runs marvelously on my two machines), neither me or the creator of the software can be held accountable for your machine breaking in any way.
Installation
Installation of Yabai is straightforward, as long as you are familiar with Homebrew. First, install yabai by typing this in your terminal:
brew install koekeishiya/formulae/yabaiTo be able to configure yabai, you need a config file. Yabai will search for this in your home directory, so create a (hidden) config file in there:
touch ~/.yabaircThis will create an empty file, which would need some sensible defaults.
# global settings
yabai -m config mouse_follows_focus          off
yabai -m config focus_follows_mouse          autofocus

yabai -m config window_placement             second_child
yabai -m config window_topmost               off

yabai -m config window_opacity               off
yabai -m config window_opacity_duration      0.0
yabai -m config window_shadow                off

yabai -m config active_window_opacity        1.0
yabai -m config normal_window_opacity        0.8
yabai -m config split_ratio                  0.50
yabai -m config auto_balance                 off
yabai -m config window_border                off

# Mouse support
yabai -m config mouse_modifier               alt
yabai -m config mouse_action1                move
yabai -m config mouse_action2                resize

# general space settings
yabai -m config layout                       bsp
yabai -m config bottom_padding               0
yabai -m config left_padding                 0
yabai -m config right_padding                0
yabai -m config window_gap                   5

# float system preferences
yabai -m rule --add app='^System Information$' manage=off
yabai -m rule --add app='^System Preferences$' manage=off
yabai -m rule --add title='Preferences$' manage=off

# float settings windows
yabai -m rule --add title='Settings$' manage=off

echo "yabai configuration loaded.."
Finally, you can make sure yabai is started by using the command below.
brew services start yabaiThis will make sure yabai starts directly. It will also make sure Yabai is started when you restart your machine.
You have yabai installed and ready, nice! Now let’s get is really useful by introducing keyboard navigation through skhd.
skhd
Where yabai is purposely built to manage your windows, skhd (Simple Keyboard Hotkey Daemon) was created to handle hotkeys on your machine. Also, it was made by the same guy that created yabai.
Skhd enables you to fill a configuration file with all the hotkeys you want to have to switch windows, move between spaces on your OS, move windows from left to right on your current space or even move windows from one space to another. No more dragging of windows with your mouse; the full power of window management at your fingertips!
Installation
Skhd is also installed through Homebrew:
brew install koekeishiya/formulae/skhd
skhd --start-service
At the initial startup it will ask permissions to the accessibility API on your mac. After access has been granted, the application must be restarted.
Configuration
Below you can find my own configuration for skhd.
# change focus
alt - h : yabai -m window --focus west
alt - j : yabai -m window --focus south
alt - k : yabai -m window --focus north
alt - l : yabai -m window --focus east
# (alt) change focus (using arrow keys)
alt - left  : yabai -m window --focus west
alt - down  : yabai -m window --focus south
alt - up    : yabai -m window --focus north
alt - right : yabai -m window --focus east


# shift window in current workspace
alt + shift - h : yabai -m window --swap west || $(yabai -m window --display west; yabai -m display --focus west)
alt + shift - j : yabai -m window --swap south || $(yabai -m window --display south; yabai -m display --focus south)
alt + shift - k : yabai -m window --swap north || $(yabai -m window --display north; yabai -m display --focus north)
alt + shift - l : yabai -m window --swap east || $(yabai -m window --display east; yabai -m display --focus east)
# alternatively, use the arrow keys
alt + shift - left : yabai -m window --swap west || $(yabai -m window --display west; yabai -m display --focus west)
alt + shift - down : yabai -m window --swap south || $(yabai -m window --display south; yabai -m display --focus south)
alt + shift - up : yabai -m window --swap north || $(yabai -m window --display north; yabai -m display --focus north)
alt + shift - right : yabai -m window --swap east || $(yabai -m window --display east; yabai -m display --focus east)

# set insertion point in focused container
alt + ctrl - h : yabai -m window --insert west
alt + ctrl - j : yabai -m window --insert south
alt + ctrl - k : yabai -m window --insert north
alt + ctrl - l : yabai -m window --insert east
# (alt) set insertion point in focused container using arrows
alt + ctrl - left  : yabai -m window --insert west
alt + ctrl - down  : yabai -m window --insert south
alt + ctrl - up    : yabai -m window --insert north
alt + ctrl - right : yabai -m window --insert east

# go back to previous workspace (kind of like back_and_forth in i3)
alt - b : yabai -m space --focus recent

# move focused window to previous workspace
alt + shift - b : yabai -m window --space recent; \
                  yabai -m space --focus recent

# move focused window to next/prev workspace
alt + shift - 1 : yabai -m window --space 1
alt + shift - 2 : yabai -m window --space 2
alt + shift - 3 : yabai -m window --space 3
alt + shift - 4 : yabai -m window --space 4
alt + shift - 5 : yabai -m window --space 5
alt + shift - 6 : yabai -m window --space 6
alt + shift - 7 : yabai -m window --space 7
alt + shift - 8 : yabai -m window --space 8
alt + shift - 9 : yabai -m window --space 9
#alt + shift - 0 : yabai -m window --space 10

# # mirror tree y-axis
alt + shift - y : yabai -m space --mirror y-axis

# # mirror tree x-axis
alt + shift - x : yabai -m space --mirror x-axis

# balance size of windows
alt + shift - 0 : yabai -m space --balance

# change layout of desktop
alt - e : yabai -m space --layout bsp
alt - l : yabai -m space --layout float
alt - s : yabai -m space --layout stack


# cycle through stack windows
# alt - p : yabai -m window --focus stack.next || yabai -m window --focus south
# alt - n : yabai -m window --focus stack.prev || yabai -m window --focus north

# forwards
alt - p : yabai -m query --spaces --space \
            | jq -re ".index" \
            | xargs -I{} yabai -m query --windows --space {} \
            | jq -sre "add | map(select(.minimized != 1)) | sort_by(.display, .frame.y, .frame.x, .id) | reverse | nth(index(map(select(.focused == 1))) - 1).id" \
            | xargs -I{} yabai -m window --focus {}

# backwards
alt - n : yabai -m query --spaces --space \
            | jq -re ".index" \
            | xargs -I{} yabai -m query --windows --space {} \
            | jq -sre "add | map(select(.minimized != 1)) | sort_by(.display, .frame.y, .frame.y, .id) | nth(index(map(select(.focused == 1))) - 1).id" \
            | xargs -I{} yabai -m window --focus {}

# close focused window
alt - w : yabai -m window --close

# enter fullscreen mode for the focused container
alt - f : yabai -m window --toggle zoom-fullscreen

# toggle window native fullscreen
alt + shift - f : yabai -m window --toggle native-fullscreen
As you can see my config is quite lenghty. First thing you might notice in this config is that I am using the alt key there as a modifier key. If you are a macOS user you might think: ‘Hm, my macbook doesn’t have an Alt key, so how does that work?’. Well, you’re absolutely right! I’ve remapped my Option key to the Alt. Mystery solved 😉.
The keybindings in there make it possible to almost ditch the use of my mouse, as I can manage all my windows using just my keyboard. For instance: when I have multipe windows open in one screen, I can switch focus between them by using the Option key in combination with H (left), J (up), K (down) and L (right). Meaning: if I hit Option + K the focus will move to the window directly above the window I currently have selected.
Some other examples:
- Move currently selected window to space 3:
Shift + Option + 3 - Use
Option + Fto have a window pushed to use the full screen. Hit it again to regain it’s former position and size. - Use
Shift + Option + Fto use macOS’ native full screen option for the currently selected window
Have a read through the config and play around with the keybindings. If you’re anything like me (meanin: a keyboard lover), you’ll be hooked in no-time!
Time for the last step: quick launching of applications on your machine by using spacelauncher!
spacelauncher
For years, I have been using Command-tab to switch applications. While this can be quite quick, I happen to have lots of applications opened at a time, especially at work. To then find an application using Command-tab can take over 5 or more keystrokes. If you do that numerous times a day, that really counts up.
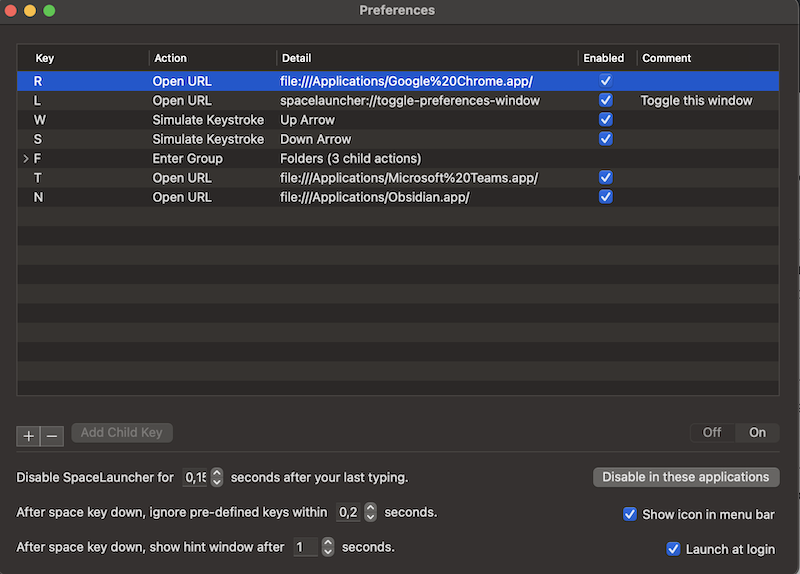
Spacelauncher will enable you to open a certain application by using your spacebar in combination with a key you can specify. For example: I can open several applications by using the following:
Spacebar-T-> open MS TeamsSpacebar-O-> open MS OutlookSpacebar-N-> open my notes (I use Obsidian for that)Spacebar-G-> open Google Chrome
Spacelauncher will open the app you specified and change focus to the space that the application is on at that moment. So instead of my pushing Command-tab to cycle through 8 applications, it takes just one keystroke! That’s gold!
You can find spacelauncher here. You can install and try it for free and without limitation, but a purchase is very much appreciated by its creator (no, not me) after it proved useful to you. To be honest: 5,99 euros is a small price to pay for this nice timesaver.
Installation of spacelauncher is a no-brainer: the app can be downloaded directly from the website. After download, all you need to do is move it to your ‘Applications’ folder.
This blog post has described how you can leverag the power of tiling window management on macOS. Using these three pieces of useful software really saves me loads of time on a daily basis. I hope it will do the same for you! Let me know if it works out for you!
Reference material
- I was very much inspired to use yabai by this comprehensive youtube video by Jesse Skelton. Definetly worth watching!
- my dotfiles, including the configuration files for my yabai and skhd.